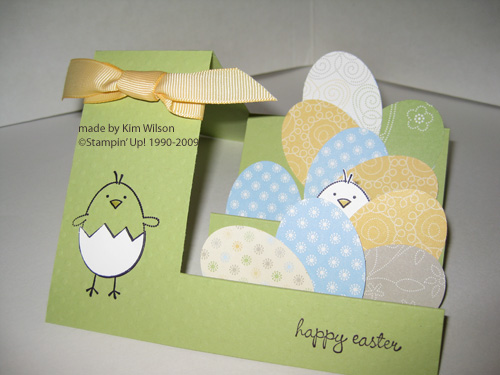
Easter Side-Step Card
This card has been a big hit around Erie ever since I showed it at our last demonstrator meeting. So I decided to give you a step by step tutorial. I adapted the measurements to fit a medium sized (invitation) envelope so it is easy to mail. You can use either your personal trimmer or Simply Scored Tool to make this card. (I made this tutorial before Stampin’ Up! came out with our wonderful Simply Scored Tool and our new Stampin’ Trimmer).
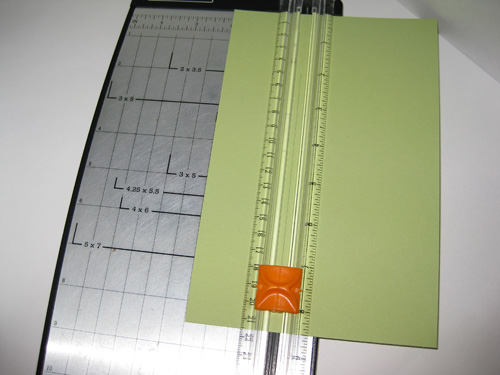
1. Cut a half sheet of Certainly Celery CS (5 1/2 x 8 1/2). Place vertically in your personal trimmer at 2 inches. Cut a slit from 2 1/8″ to 7 1/2″.
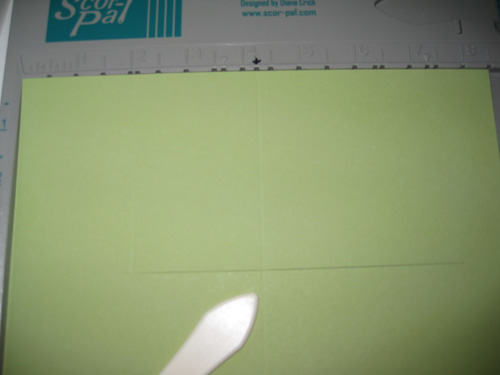
2. Use your scoring blade or Scor-Pal, place the CS horizontally with slit down.
From the top to the slit, score at 2 1/8″ (this will be the dot on your Scor-pal).
Score the entire card at 4 1/4 ”
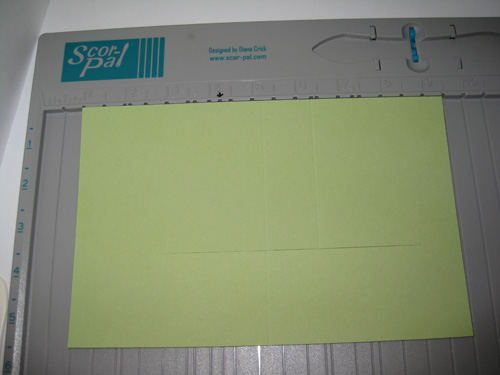
3. Score from the top to the slit at 5 3/8, 6 1/2″ and 7 1/2 “.
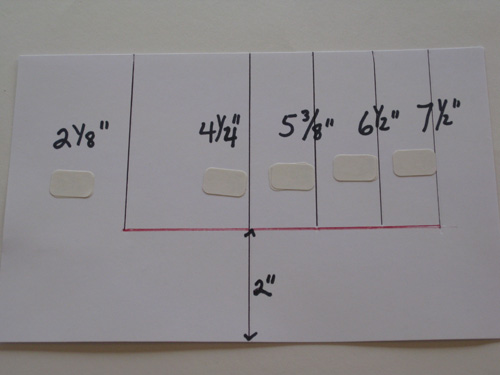
Red line = cut, Black line= Score.
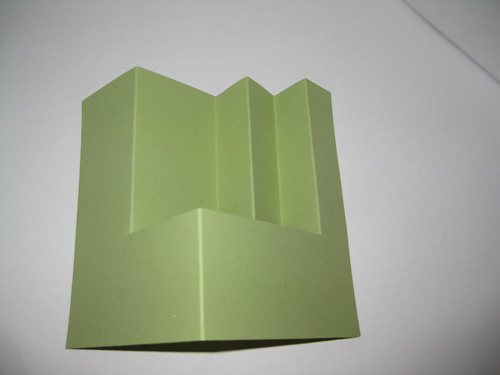
4. Accordian fold the card as shown. The 4 1/4″ score will be mountain folded at the narrow part, and valley folded at the wide part.
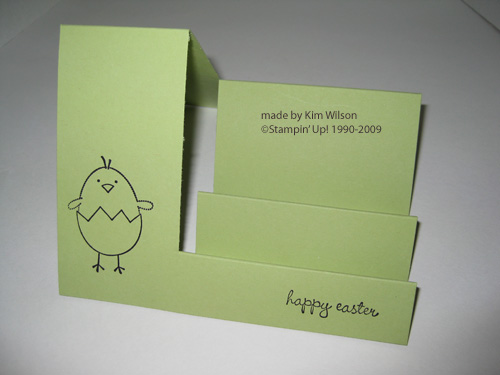
5. Stamp chick from A Good Egg stamp set onto card and also twice onto a scrap piece of white CS. Stamp Happy Easter sentiment.
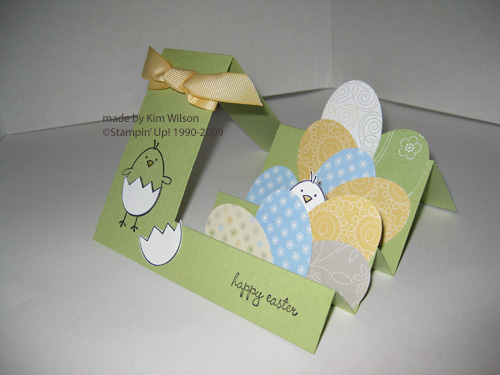
6. Trim around the white eggshell and adhere to the chick. Trim around the top of the white chick to tuck among the eggs. Use your So Saffron Marker to color the chick’s beak. The eggs are punched with the Wide Oval Punch and the Delicate Dots Designer Paper . Add a piece of ribbon and you are done!
I think I just rediscovered the card that was my inspiration – here
Stampin’ Up! products can be purchased – here
27 Comments »
RSS feed for comments on this post.
Leave a comment
Line and paragraph breaks automatic, e-mail address never displayed, HTML allowed: <a href="" title=""> <abbr title=""> <acronym title=""> <b> <blockquote cite=""> <cite> <code> <del datetime=""> <em> <i> <q cite=""> <s> <strike> <strong>
March 25th, 2009 @ 5:05 am
Good Morning everyone,
I saw the Easter card ideas and think they are great, you are really talented to be able to create something like that. Keep up the good work. I wish I could make my own cards, I have tried in the past, but they looked terrible. I think I may have found an alternative if you don’t want to give your money to those big greetings card companies. since I am a new fan of electronic greetings cards, I thought I would add a quick comment. I have spent ages on the internet and found a really cool Free Easter e-Card site. This particular site has an awesome application where you can upload a photograph of yourself and incorporate it into your card. This is such a clever idea, and adds that personal touch, and as I already mentioned this particular site is totally free. I think e-Cards are definitely worth a try, they are not for everyone, but I am becoming a fan. Just wanted to share my findings with you all. Have a good rest of your afternoon, Nicole.
March 26th, 2009 @ 9:28 am
Hi. Kim. Three things… One this is a great card. I made three yesterday. But I do have a couple questions…. Where on the directions it says to score at 4 1/2 wouldn’t it be the 4 1/4 that was already scored?? On the diagram that shows the cut line red and the score lines black?? Just wanted to know. I made mine yesterday onthe 4 1/4 and it worked great but when I am not sure I try tofollow the direction to the end. LOL And third, am i allowed to share your card and directions with my upline and sidelines??
March 30th, 2009 @ 9:32 am
This is so AWESOME and I can’t thank you enough for going to the trouble of posting a tutorial this great! I can’t wait to make it myself, and will use it in my Extreme Card classes this summer. I can see it used with a number of stamp sets, but I sure love the idea of punching out all those eggs. I have Shelia’s questions, too: Can I share this card with my upline and sidelines???? And, shouldn’t we be paying you for your idea????
March 30th, 2009 @ 12:38 pm
Hi everyone,
yes it should be 4 and 1/4 not 4 1/2 on the diagram. I’ll try to fix that picture.
And yes you can share this project. The original idea is not mine – I have seen other stair step card posted in multiple places. I just played around to find the measurements to fit a regular sized card that would be easy to score.
April 1st, 2009 @ 3:25 pm
Hi Kim,
I just tried making your card using you tutorial. I haven’t stamped anything on it yet but at least I have the cutting and folding down. It was alot easier with your tutorial than I thought it would be just looking at the card. Thanks for sharing!
June 25th, 2009 @ 10:28 pm
[…] 3 embellishments. I chose to try something a little different as well and googled and came across this site. From there, I was able to create a card that I feel reflects the perfect layout for a monkey. […]
July 7th, 2009 @ 9:14 pm
[…] done step cards before, but this is a Side Step Card. I first saw it over here at CraftDoc, with a wonderful tutorial on this funky style of card. I had a houndstooth patterned […]
August 8th, 2009 @ 9:16 pm
I was looking through the gallery at SCS and came across this fantastic card shape…so much more interesting than just the stairs. Thanks for a wonderful lesson on how to engineer the card.
August 28th, 2009 @ 9:51 am
Great card and instructions. Thanks for sharing on the die cut list!
September 2nd, 2009 @ 11:20 pm
Thank you for sharing these instructions for your side step card. I have used this as a basis for a black and white card, using the Fifth Ave Floral set. I hope you don’t mind my referencing you.
September 12th, 2009 @ 5:40 am
[…] 60th Birthday card! When I saw this tutorial on how to make a Side Step Card, I knew straight away what I was going to make! […]
September 25th, 2009 @ 7:34 am
Hi, I recently made a stair step card and then found your blog!!! Thanks for sharing how you did it and I hope you do not mind that I have pointed people to your blog as many asked how I made it and your instructions are so good I had to share them.
Great blog too.
xxxeileen
September 26th, 2009 @ 3:52 pm
This is so beautiful. Thanks so much for sharing your talent.
October 5th, 2009 @ 7:09 am
Kim.,,,,,, Thanks so much for the directions and measurements for this great card.
December 16th, 2009 @ 11:10 pm
just want to say a big thanks..i have been having trouble readding the directions from another tut..”you’ have made it so easy with this wonderful tut.!! complete with the pics. and diagrams..i can quit pulling my hair out on the other one..lol..loves ya
December 22nd, 2009 @ 10:23 am
Just found your site. Thanks so much for the instructions.
March 11th, 2010 @ 2:25 pm
Thanks so much for sharing the instructions for your side step card. I have a link to this from my blog!
http://bronaddinktivedesigns.blogspot.com
March 18th, 2010 @ 11:38 am
[…] http://craftdoc.blogs.splitcoaststampers.com/2009/03/24/easter-side-step-card/ […]
March 19th, 2010 @ 8:57 pm
Thanks so much for this tutorial! I just googled “side step card tutorial” and found this! Off to give it a try!
March 23rd, 2010 @ 4:33 pm
Wow at last a tutorial that I can follow and it works, Thanks so much for taking the time and sharing with us
March 31st, 2010 @ 7:34 am
I’ve been trying to fathom this out myself, found your tutorial and I’ve made 4 card blanks in as many minutes…Thank you for this easy to follow tutorial.
August 12th, 2010 @ 9:17 am
[…] this CRAFTDOC � Blog Archive � Easter Side-Step Card __________________ Cindy Nagel Stampin’ Up-The stamp & scrapbook store that comes to your […]
October 15th, 2010 @ 3:12 pm
Totally awesome do you have other to share…..
March 5th, 2011 @ 12:54 am
Sorrow is hushed into peace in my heart like the evening among
April 25th, 2014 @ 2:09 pm
[…] decided to update my Easter Side Step card from 5 years ago. The Tutorial is HERE – one of my most visited […]
April 9th, 2016 @ 9:55 pm
I see your site is outranked by many competitors in google.
You should spy their backlinks and use them for your site and you will hit top3 very fast.
There is useful tool for this, just search google for ; rilkim’s tips
April 19th, 2016 @ 4:08 pm
I blog frequently and I truly appreciate your content.
This great article has really peaked my interest.
I am going to bookmark your site and keep checking for new details about once
per week. I subscribed to your Feed as well.